Sunday, October 30, 2011
Sunday Afternoon
Tuesday, October 25, 2011
Paper and........
Since I don't have enough paper (that would be sarcasm with a capital "S"), I stopped by the Lobby yesterday to see what I could find. Since this blog is about paper, I thought you might like to see what I got. I tore a couple of sheets out of each bundle so you could see how *CUTE* they are:
This one is "Lost & Found - Union Square" by My Mind's Eye. It is a 6 x 6 inch designer paper pad with 24 sheets of *double-sided* cardstock paper! The sheet on the right is a piece of music and the one on the left reminds me of a vintage wallpaper pattern. The pad has 2 pieces of 12 different designs.
The paper pad shown below has 8 pieces of 6 different designs = 48 sheets!!!! AND.....the sheets are double-sided. The paper size is 6"x6". It is the Conservatory pack by 7gypies. I really go for the vintage look and these papers do not disappoint. The 2 shown below look like pages from old textbooks showing different species of birds and butterflies. I can't wait to use these!
The other pack of October Afternoon paper that I bought was Modern Homemaker. The paper on the right is a red/cream plaid that kinda reminds me of the old oilcloth table covers. The picture on the left is a page from an old magazine with vintage advertising and 3 "prize-winning recipes". The pack also has paper that has vintage kitchen appliances/utensils printed on it.
I hope to make some cards soon using these new papers.....I will post pics. You may want to visit the websites (and then link to their blogs) for the companies listed above. Their websites and blogs have lots of great ideas along with other product lines. Happy crafting!!!!
Monday, October 17, 2011
Fall Holiday Cards
The base is orange cardstock. I cut a strip of thanksgiving paper using pinking shears and adhered it to the cardstock. I cut out part of a Thanksgiving song (using the pinking shears) and adherred it diagonally on top of the cardstock/thankgiving paper. A clear "give thanks" sticker was placed on top of the song and I topped it off with a cute little bow made from orange metallic ribbon.
I'm a piano player and I LOVE incorporating pieces of music on my cards. I have several old hymnals and songbooks that I use to find "the perfect song" to add to a card. You can find hymnals and music books quite cheap at used book sales and thrift stores.
Saturday, October 15, 2011
A Christmas Card That *Anyone* Can Make!!
This card is for those of you who say: "I'm not crafty/talented enough to make cards." or "I just don't have time to make cards" or any other excuse you can come up with.
It doesn't get much easier than this! Here's a list of supplies to gather:
Holiday-colored blank cards
A few sheets of holiday paper (Hobby Lobby or JoAnn's has a great selection)
A sheet or two of brown paper
A "star" rubber stamp or stickers
Green or Red Rickrack (use the tiny/baby size)
Cut a strip of brown paper for your Christmas tree trunk and adhere to blank card.
Cut strips of holiday paper (different lengths as shown in the sample card) and adhere to card starting with the longest length at the bottom.
Rubber stamp the star or adhere a star sticker to top of tree
Cut different lengths of rickrack and glue (Alene's craft glue is my fave) diagonally to your tree.
YOU'VE JUST CRAFTED A HANDMADE CHRISTMAS CARD!!!!
If you have Christmas "sentiment" rubber stamps or stickers, you can decorate the inside with a "Merry Christmas" or "Happy Holidays", etc.
This really makes a cute and simple card. I used paper with red, green and white polka dots so it looks like the tree has ornaments. You could also adhere little "gemstone" to your tree for ornaments if you wish. Depending on the design of your holiday paper, you may not wish to add any embellishment other than the rickrack to keep the design looking simple.
So now you have no excuses..............................start crafting!
Thursday, October 13, 2011
A Few More Completed Projects
This is Kitty Cottage Sampler by Little House Needleworks which I actually finished stitching in January 2010 but only recently had framed.....I don't like to rush into things :o)
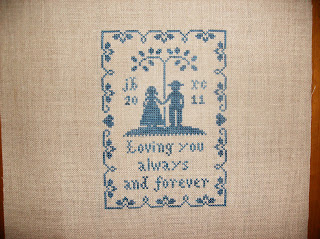
Always and Forever - also by Little House Needleworks
Little House Needleworks is one of my favorite cross-stitch designers.
Oh, I also want to promote my friend Cheryl's card-making blog - she makes *awesome* cards - take a look!
Wednesday, October 12, 2011
Stationery card
Hello Out There............
Followers for my new Blog.
Serious inquiries only.
Apply by clicking on "join this site".
Tuesday, October 11, 2011
Welcome to My World
I was actually pretty good at it this year. I think the last entry I journaled was July - Nope, sorry, I just looked, it was June 13. That's not too bad and maybe I'll start again tomorrow with an entry that says "finally blogged".
Anyway, this blog will mainly be about card making projects that I am doing or cross-stitch that I am working on with a random book review thrown in every once in awhile. That should explain my blog name "Paper and Fabric and Books...Oh My!"
I am somewhat unorganized in my craft supplies. While looking for supplies to "embellish" a card, I found this
How cute! An ornament cut-out! (BTW, it is propped up on my *new* Thirty-One Expand-A-Tote) I started looking for scrap strips of Christmasy-colored paper which I used to cover the back. Adhesive was applied on the back of the white cardstock, the colored strips were placed face-down (diagonally) to the back of the white cardstock. Once that was done, I added a little ribbon "hanger" to the front of the card and embellished with a diamond gemstone. I used some maroon ink to lightly smudge around the white cardstock and attached the white cardstock to green cardstock. This was then attached to a 4x6 white card. I stamped the word "celebrate" at the bottom using green ink. Here is the finished product...........
I actually purchased a package of these ornament cut-outs at a CKC show at Opryland two years ago. A package of 4 was $1.25. The package had *no* information on it.....like who I bought them from, a website for reordering, etc. BUT.....I've had this business card hanging on my bulletin board for awhile and once I came across the ornament cut-outs, I just *knew* that the business card *had* to be for the vendor who sold these cute cut-outs. Sure enough, I looked at the website listed on the business card and found more of these cute cut-outs. For some reason, they are called "frames" on the website. The website is http://www.designsbydreamer.com/ - some of the info is very out-of-date (such as the page for her "schedule") but it appears that you can still order supplies from the business. And I'm sure that there is a template somewhere that will do this design....but since I don't have a die cutter, I may have to order a few more packages of these.
Oh, to finish off my card, I did stamp "Merry Christmas" inside using green ink. Hope this inspires you to make a handmade Christmas card.